As bodybuilders, we often find ourselves stuck in routines—sometimes they feel productive, but other times, they can be downright boring. That’s where the “Boring But Big” philosophy comes into play. Developed as a high-volume training approach, Boring But Big encourages lifters to put their egos aside, focus on consistency, and genuinely put in the work.
Today, we’re applying this mindset to a high-intensity leg workout designed to sculpt and strengthen your lower body while also reminding you that true gains often come from the basics—yes, even if they seem boring at times.
The Boring But Big Philosophy
Boring But Big” doesn’t mean you should just sit back and grind through your workouts mindlessly. Instead, it emphasizes the importance of sticking to fundamental exercises while maximizing intensity and volume. When it comes to legs, incorporating this philosophy can lead to noticeable gains in strength and size. Let’s explore a leg workout that follows the Boring But Big approach to keep you focused, motivated, and growing.
Warm-Up: Getting Ready for Battle
Before starting any high-intensity workout, a proper warm-up is essential. It’s easy to skip this part, thinking it’s too boring, but trust me, your legs will thank you.
**Warm-Up Routine:** – **5-10 Minutes of Cardio:** Start with light jogging or cycling to increase your heart rate and blood flow. – **Dynamic Stretches:** Leg swings, walking lunges, and bodyweight squats will prepare your legs for the heavy work ahead.
High-Intensity Leg Workout Inspired by Boring But Big
1. Barbell Squats – 5 Sets x 5 Reps
No leg day is complete without squats, and they fit the Boring But Big mantra perfectly. Focus on increasing your weight each week. The goal is to maintain impeccable form while driving intensity. Ensure you’re pushing yourself without sacrificing technique.
Pro Tip: After your primary sets, drop the weight by about 20% and perform 5 additional sets of 10 reps to really hammer home the “big” aspect of the Boring But Big routine.
2. Romanian Deadlifts – 4 Sets x 8 Reps
This exercise might seem straightforward, but it’s incredibly effective for building hamstring strength. Perform them with a slow, controlled tempo to maximize muscle engagement—the simplicity aligns with the **Boring But Big** approach.
**Variation:** Consider alternating with dumbbell Romanian deadlifts to change up your angles and keep your mind engaged.
3. Leg Press – 4 Sets x 10 Reps
The leg press machine allows you to push heavier weights safely while still focusing on the fundamentals. As a part of your **Boring But Big** program, perform these with a controlled cadence, ensuring maximum tension throughout the movement.
4. Walking Lunges – 4 Sets x 12 Reps per Leg
Walking lunges might feel mundane, but they’re incredibly effective for hitting quads and glutes. Incorporating variations like reverse lunges or lateral lunges can add a fun twist to this otherwise straightforward exercise while keeping your workout aligned with the **Boring But Big** principle.
5. Goblet Squats – 4 Sets x 10-12 Reps
Goblet squats are another excellent tool for hitting the quads and improving squat form. They serve as a reminder that some of the best exercises are the most basic. Keep your core engaged and focus on holding the weight for stability.
6. Calf Raises – 5 Sets x 15-20 Reps
Calves often get neglected, but incorporating them into your routine ensures a well-rounded leg day. Simple standing or seated calf raises can be a staple exercise that exemplifies the **Boring But Big** philosophy.
Finishing Strong: HIIT for Legs
To wrap up your high-intensity leg workout, it’s time to flip the script and include some high-intensity interval training (HIIT). This can feel a bit more exciting than traditional boring sets but still sticks to the essentials.
Suggested boring but big: HIIT Workout:
– **Sprints:** 10 rounds of 20 seconds on, 40 seconds off. – **Box Jumps:** 5 sets of 10 reps, focusing on explosive power.
Cool Down: Embrace the Recovery
As important as the workout itself, a proper cooldown is key. Stretching those hard-working leg muscles is essential for recovery and to avoid injury. Spend 10 minutes on static stretches targeting your quads, hamstrings, and calves.
Conclusion
Embracing the **Boring But Big** philosophy during your high-intensity leg workouts might not sound thrilling, but it’s a surefire way to see results. By focusing on tried-and-true exercises, maintaining intensity, and pushing.
-Terry Asher
Terry Asher
After changing his best friend’s life by helping him lose over 70lbs, dropping him down to an amazing 7% body fat, Terry was inspired to be a full-time internet trainer knowing he could do the same for many more. In 2010, Terry published his own diet and fitness e-book that can be purchased on this website. Let Terry help you change your body for the better!
There are many joys of being a woman… but, for many, menstrual cycles don’t exactly top the list. Before your period comes, you might be among the estimated 75 percent of women who experience PMS symptoms like bloating and irritability. When it arrives, you might bleed heavily through your tampon or pad, scurrying to do damage control before your clothes show signs of leakage. And in the midst of it all, you might even experience irregularities that can have you scratching your head as to what the heck is going on inside your body—and if these newfound changes may be cause for concern.
We asked Cynthia Abraham, MD, FACOG, a board-certified OB-GYN with Mount Sinai Hospital in New York City, to walk us through the what’s and why’s of irregular menstrual cycles.
What Is a Normal Period?
“Normal menses typically occur every 21 to 35 days and last 4 to 7 days,” says Dr. Abraham. Per the Mayo Clinic, longer cycles are more common in the years closer to when you first start menstruating, and they tend to become shorter as the years go on.
Normality, however, can also vary from one individual to the next. For instance, you might typically have a cycle that lasts 30 days with 6 days of bleeding—while your bestie has a 21-day cycle with 4 days of bleeding. In either case (both of which are considered ‘normal’ in and of themselves), any changes that notably stray from your norm can be considered irregular. This applies not only to how long your cycles and period last, but also how heavy they are and any new (or more intense) symptoms that arise.
What Causes Irregular Menstrual Cycles?
Any number of factors—both short-term and more medically significant—may trigger menstrual irregularities.
“Stress and excess weight gain or loss—especially in those engaging strenuous workouts that lead to very low body fat—are very common lifestyle factors that contribute to irregular menses,” Dr. Abraham shares. You might also notice a temporary shift in your menstrual patterns if you’ve recently recovered from a viral infection or another stress-inducing illness, she adds.
Hormonal birth control (including the pill) and IUDs can also affect your period, as can certain medications.
Per the US Department of Health and Human Services, medical and health issues that can cause irregular periods include:
Issues with your ovaries
Thyroid and adrenal issues
Uncontrolled diabetes
Eating disorders
Naturally, perimenopause (i.e., the transition to menopause, typically in your late 40s to early 50s) will also mark notable shifts until you cease to menstruate. You’ll also need to rule out pregnancy if your period is past due.
Lighter Periods
If your periods are lighter than normal, it may simply be attributed to the ticking of your biological clock. “Lighter periods are very common as one ages,” says Dr. Abraham. (I, for one, have recently noticed that my own menses are getting lighter than usual: a welcome treat for the sake of my tampon use, sure, but also a wake-up call that I’m far from being a spring chicken these days.)
Heavier Periods
If your periods are heavier than they usually are, it might be time to consult your OB-GYN. “Heavier periods are far more concerning [than lighter periods] and warrant medical evaluation, as it may be indicative of a new-onset hormonal imbalance or a structural issue such as a fibroid,” Dr. Abraham warns.
When to Consult Your OB-GYN
Some period irregularities are innocuous enough, while others may be more concerning.
According to Dr. Abraham, you’ll want to visit your MD if and when:
You need to change your pads/tampons every hour or two while menstruating
Your menstrual cycle lasts longer than 7 days
Your menstrual pain can’t be managed with OTC meds like Motrin or Tylenol
Penn Medicine adds that you should seek medical intervention if you haven’t had your period within the past 90 days.
Of course, you can always discuss any more mild changes with your menstrual cycle during your annual OB-GYN visit and see if any interventions are necessary.
The Takeaway on Irregular Periods
There’s a pretty sizable window into what a normal period can look like from one woman to the next. However, if your menses deviate significantly from your own usual—namely if you bleed heavily, have a period that lasts longer than a week, or if painful symptoms suddenly arise or worsen—your best bet will be to consult your medical provider.
For less severe cases—say, if your period and/or cycle length deviates by a day or two or it seems to be getting lighter—you don’t need to stress yourself out. Slight changes aren’t a major cause for concern. Yet if they’re accompanied by other signs of feeling worse for wear, Dr. Abraham says a little extra TLC will do your menstrual health and overall well-being some good.
To promote period regularity, she advises keeping your stress under control. Her go-to recommendations include getting enough rest, plus relaxation techniques such as yoga and acupuncture. “These can only help, as well as maintaining a healthy diet and exercising moderately,” she shares. While the advice isn’t game-changing, it’s tried and true to keep your mind, body, and hormones healthy, happy, and harmonious.
Should you need some extra support to relieve PMS symptoms (think: hormonal acne, bloating, mood swings, discomfort, and breast tenderness), you might want to check out a hormonal support supplement like HUM’s SOS PMS gummies. Chasteberry helps provide PMS relief and vitamin B6 promotes a balanced mood. All the while, cranberry adds a little something extra for urinary tract support.
Nutrition apps are a dime a dozen, with one of the most popular options on the market being MyFitnessPal.
However, a relatively new app, MacroFactor, has taken the fitness world by storm. It is slowly proving to be easier to use, more intuitive, and more accurate than many of the “big dogs” on the market.
Read on to learn about this app, how it can elevate your nutrition, and whether you should try it.
Let’s talk about it.
TL;DR
Type: Nutrition
Price starts at $11.99 / month
Free Version: free 7-day trial
Best for: Intuitive Diet Tracking
Get your Diet on track with MacroFactor in 2024
MacroFactor is a paid nutrition tracker app that offers incredible customizability. The app is straightforward to use and constantly adapts to your total daily energy expenditure (TDEE), providing the most up-to-date recommendations for your diet.
One thing that sets the app apart from competitors is that MacroFactor receives regular updates, some of which align with scientific findings in the nutritional space.
Another difference between MacroFactor and other apps is that this app constantly updates your nutritional targets based on your metabolic rate and how it changes over time. It examines your data and uses a sophisticated model that predicts metabolic adaptations.
MacroFactor encourages and rewards users for consistently tracking their nutrition rather than trying to be perfect. This allows app users to confidently take control of their diet and not fret over every calorie they consume.
Now, here is the kicker:
MacroFactor was created by Greg Nuckols – a well-known fitness expert in the industry. Greg summarizes research in his Monthly Applications in Strength Sports (MASS) review.
In other words, this is different from some look-alike nutrition apps created to offer the same as any other app on the market to make some money. Greg genuinely knows his stuff, especially considering he has competed in powerlifting and natural bodybuilding, respectively.
How MacroFactor works (and what makes it great)
In their words, “MacroFactor offers an empowering, sustainable approach to nutrition tracking without stress, shaming, or rigidity. It uses scientific algorithms to drive smart recommendations that fit your lifestyle.”
Here is how it works:
First, answer basic questions about your dietary preferences, goals, and lifestyle. The app will recommend calorie and macronutrient goals based on your input data.
Second, take a few minutes daily to log your weight, the foods you eat, and the quantities. MacroFactor will then use the information to calculate your caloric expenditure and needs with even more precision.
From there, the app will make intelligent and accurate changes to your macro plan each week based on how your body responds. This is different from many apps that follow pre-written rules and make new recommendations, regardless of the data you input.
The best part? You do not have to be robotic or perfect with your diet. Simply put, log your weight and food intake; the app will do the rest. In a nutshell, that is how the comparisons of MacroFactor’s Pro’s and Con’s looks like.
What we like ⭐️
Not so much ❌
Customizable Nutrition Tracking: Not only does it allow for personalized nutrition plans, but it also updates based on your metabolic rate changes.
Learning Curve: The app may have a slightly complex interface, requiring some time for new users to navigate efficiently.
Expert Design: Created by fitness expert Greg Nuckols, ensuring that the app is backed by solid science and expertise.
Food Database Limitations: Lesser-known or new Products outside the US might not get recognized, requiring manual input.
Comprehensive Progress Tracking: Keeps track of weight trends, photos, and measurements for a holistic view of one’s fitness journey.
No Micronutrient Tracking: Focuses predominantly on macronutrients, not providing detailed data on vitamins and minerals.
Diverse Food Logging Options: Offers an extensive food database, barcode scanning, and the ability to import recipes from websites.
Subscription-Based: No free version, only a 7-day trial. And there are no discounts or promo codes available.
And now, let us dive in to details of the top four features of MacroFactor.
How to get started with MacroFactor
Getting started with MacroFactor is straightforward. First, go to the App Store or Google Play and download the app. Then, create a profile or log in with an existing one (Google, Apple, etc.).
The app will immediately offer a no-strings-attached one-week free trial (though you must confirm a payment method before it takes effect). Do not worry, though. You can cancel your trial at any point and will not be charged if you decide that MacroFactor is not for you.
Once inside the app, you will see your dashboard with all the relevant information and features. The information the app displays includes nutritional targets (protein, carbs, fats, and calories), caloric expenditure, weight trends, and more.
One thing the app does well is displaying your nutritional targets for each day and showing you what calories and macronutrients you have covered up to that point.
The great things about MacroFactor
1. Several Inputs for Food Logging
You can log your foods with the barcode scanner, manually write the food, or through voice input. The app also allows you to save recipes for future inputs, and you can add additional ingredients if you make specific meals in new ways.
For example, if you use the same recipe for scrambled eggs but decide to add a bit of mayo one day, you can simply add that in, and the app will re-calculate the calories and macronutrients for that meal.
2. Continual Updating of your Expenditure and Nutritional
Targets What sets MacroFactor apart from many other nutrition-tracking apps is that it collects data from the user to determine if their expenditure has changed.
It considers data such as the number of calories burned during exercise and daily activity and resting metabolic rate (which, to a degree, depends on body weight).
Other apps use a basic TDEE formula to estimate calorie expenditure and never adjust afterward. In contrast, MacroFactor keeps updating nutritional targets, taking the guesswork out of the equation.
3. Several Ways to Track Your Progress
Nutritional tracking and recommendations are great, but they are only helpful if people can track their progress. After all, how would someone know if their calorie intake is appropriate for their goal when they can not tell if they are seeing improvements?
Because of that, MacroFactor has included the option of uploading progress photos and circumference measures (chest, arms, thighs, waist, etc.) for easy comparison. Combined with weight trends, users can get a much better idea of their trajectory.
Is MacroFactor Free? How much does it cost?
There, unfortunately, is not a free MacroFactor version. However, there is a 7-day free trial to test the app and its features and determine if it is the right fit for you.
The app offers three different paid subscription options:
Trial: 7 Days
Monthly: $11.99 per month
Every 6 months – $47.99 per 6 months
Yearly – $71.99 per year
Are there discount codes for MacroFactor? No, there are no discounts. However, using “HOTELGYMS” as an affiliate code will extend your free trial when signing up in the app. The affiliate code will auto-fill as you type.
Our Thoughts on MacroFactor
In short? We love the app because it provides everything users need to track their food and chase the right nutritional targets that align with their goals vs. just chasing calories.
The app is created by people who know their stuff, and its algorithm makes it easy to use, intuitive, and far more accurate than some other nutritional trackers on the market. It almost feels like having a nutrition coach in your pocket.
With its rich food database, multiple options for logging meals, simple and intuitive interface, and dynamic nutritional recommendations, MacroFactor is a fantastic option for beginners and advanced trainees looking to control their diet and reach their goals – fat loss, muscle gain, etc.
Conclusion
MacroFactor is a simple, intuitive, and flexible nutrition-tracking app. It features a great user interface, constantly updated and accurate nutritional recommendations, a rich food database, and several ways to log food.
The app makes nutrition tracking a natural part of the day and is designed to promote consistency over perfection.
FAQs
Let us summarize the article by going over some of the typical questions people ask related to the app:
1. Is MacroFactor a legit app?
Yes, MacroFactor is a legit nutrition-tracking app made by an fitness industry expert – Greg Nuckols.
2. What makes MacroFactor great?
Some things that make MacroFactor great are its simplicity, intuitive interface, dynamic nutritional recommendations, accuracy, and ease of logging your food intake.
3. How accurate is MacroFactor?
While there is always debate surrounding nutrition apps and their effectiveness, MacroFactor is designed to be as accurate as possible. The app collects data and uses its sophisticated algorithm to continually update your nutritional targets, keeping you on track to reaching your goals.
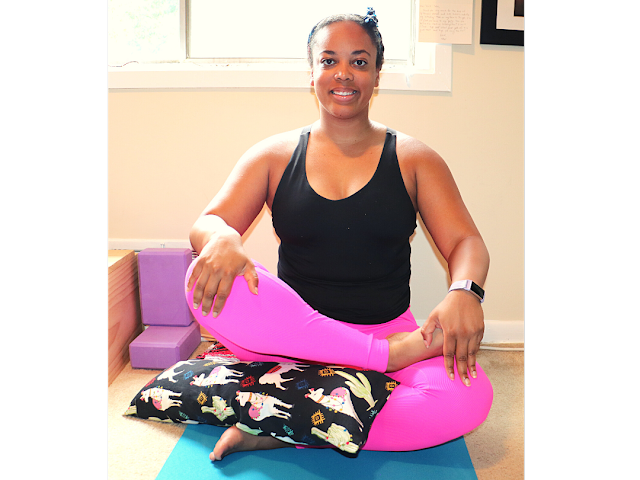
As a yoga teacher, I incorporate the yoga bolster into my personal practice as well as my restorative yoga classes. I also use a bolster as a cushion while meditating. Learn more about yoga bolsters – and different ways to incorporate them into your practice – in this post.
What are yoga bolsters?
A yoga bolster is a rectangular or cylindrical pillow/cushion used in yoga practice to provide support and comfort. Bolsters can be made from a variety of fabrics and can be filled with materials such as buckwheat hulls, cotton batting, polyester, and foam, and weigh about five pounds. I tend to like foam the least, and I prefer cotton or buckwheat as my top filling choice.
While they are typically firm and have rounded edges, they’re usually softer than blocks and also much larger, so they can support more of your body. Some yogis – myself included – use bolsters as meditation cushions.
What should you look for when buying a yoga bolster?
A bolster should be firm, but it shouldn’t be hard. You want it to be firm enough to support your body, but not so firm that it causes discomfort. I prefer bolsters that are about the firmness of the cushions on the back of your sofa.
Does the shape matter?
I’ve found that more rectangular bolsters work better for practice. The more round a bolster may be – especially if it’s a larger bolster – the harder it may be for certain postures. For example, if you’re lying on a bolster or sitting up against it, it may feel uncomfortable on your spine.
However, a round bolster, as long as it’s not large, may feel better when placing it underneath your knees when you’re in a supine position or your ankles when in a prone position.
Material options
Outer shells are typically made of cotton or similar materials, but some are made of fabrics such as nylon that can be wiped down in between practice sessions. These are particularly helpful at studios and gyms where they may not wash the covers frequently – if at all. For my at-home practice, I prefer cotton covers. They’re not “squeaky” when you’re using them, and they’re a softer surface than the nylon covers.
The firmer the material, the lower the possibility of it shifting during your practice. The nylon covers can also be slippery at times, making it more difficult to stay in place while leaning against them or placing a blanket on top.
Does size matter?
The best size bolster depends on how you intend to use it during practice. My favorite bolster’s dimensions are 11″ x 25″ x 6″; however, I have a homemade bolster* that is the same length but half the width and height.
In general, most yoga bolsters you’ll find in studios and gyms are about 24 inches long and 12 inches wide, but they can come in a variety of sizes. For example, there are pranayama bolsters, which are much narrower and can be used differently.
*Fun fact: My mom made the two of us yoga bolsters (mine has a cute llama design), and mine turned out to be much narrower than my standard bolster, but it’s perfect for pranayama, to use under my knees in savasana and under my shoulders during heart openers, and to use in place of a rolled blanket.
How do you use a yoga bolster?
I consider yoga bolsters to be one of the most essential props for at-home yoga practice. Yoga bolsters can be used for many reasons; nonetheless, they are typically used to support your body, bringing your body/body parts closer to the floor, while also releasing pressure and tension in the areas supported by the bolster – muscles, joints, etc. This support helps relieve tension by allowing you to relax more deeply into the posture.
One of my favorite ways to use the bolster is to sit on it cross-legged during meditation or pranayama practice. As I noted earlier, I like to place a bolster under my knees during savasana. Since having surgery, I have had a lot less low back pain, but it still feels nice to modify the pose in this way.
What yoga styles/classes use bolsters?
I regularly use bolsters for yin yoga practices (Yin Yoga and Restorative Yoga predominantly), meditation, and pranayama practices. I don’t typically use them during my Hatha/Vinyasa-style classes, but find that they can be helpful for people practicing inversions who are nervous about the possibility of falling over.
What poses use a yoga bolster?
In my weekly restorative yoga classes, I use them for a majority of postures and offer them as an option for modified versions of poses. I like lying on bolsters in Crocodile Pose, propping the bolster against blocks and leaning back during supported reclined bound angle pose, under the knees in Savasana and Mountain Brook Pose, supported backbends, under the sacrum in Supported Bridge Pose, under your body in Child’s Pose, and more.
While I don’t typically use a bolster during my Hatha/Vinyasa-style classes, it doesn’t mean you can’t! A bolster can be great for certain hip openers as they bring the floor closer to your body. For example, if you have a difficult time with fire log or pigeon poses, a bolster can help fill the gap between your body and the ground, allowing you to relax more, and maybe even deepen the posture in the process.
Check out the video below for a full restorative yoga practice that incorporates a yoga bolster.
Full restorative yoga practice to help you unwind.
Who should use yoga bolsters?
Anyone and everyone! I’m a big advocate for utilizing props in your yoga practice. There are so many benefits to using props in general. Still, bolsters are especially great for people who are looking to find more ease in poses and for yogis who are feeling nervous about certain inversions (i.e. crow pose). How? You can place the bolster in front of, behind, or to the side of you to have a soft surface for landing. You probably won’t end up needing it, but sometimes it helps just to know that the support is there for you!
Who makes the best yoga bolsters?
My favorite style bolster is the Standard Solid Yoga Bolster from Hugger Mugger. This is my favorite brand to use when teaching, and I also have one at home. I think they’re the perfect size, shape, and firmness for restorative yoga practice.
At extendYoga, where I teach a restorative yoga class once or twice a month, they have bolsters that you can spray and wipe down, which is great for a studio or other public setting. As I mentioned earlier, bolsters with fabric coverings aren’t easy to clean after every class, let alone in general, so this is a great option for studios and clubs.
Conclusion
Yoga bolsters are a versatile prop that can be used to support the body in a variety of ways. They are especially beneficial for restorative yoga, pregnancy yoga, and yoga for beginners or people with injuries. If you are new to yoga or if you are looking for ways to deepen your practice, consider adding a yoga bolster to your yoga prop collection.
Don’t let your desk job be a pain in your backside! When you’re sitting all day, both your glutes and hamstrings become inactive, leading to tightness, reduced flexibility, and even lower back pain. But a quick glutes and hamstrings workout is just the thing to get you moving and feeling stronger.
“Glutes and hamstrings are such a powerful workout combo, because they work together to power some of your biggest movements—like deadlifts, hip thrusts, and leg curls,” says Kelsey Wells, personal trainer for the Sweat app. “Your hamstrings help with hip extension, and when they’re strong and balanced with your glutes, you get better strength, power, and stability in your lower body.”
Experts In This Article
Kelsey Wells, NASM-certified trainer and the creator of the PWR programs on the SWEAT app
This workout was designed by Wells to reactivate and strengthen these key muscles, helping you restore mobility and alleviate stiffness so you can move more freely and powerfully.
“This combo helps build strength and reduces the risk of injury, especially in your knees and lower back,” she says.
Join the movement
If you’re following along with our Movement of the Month Club, these are the moves for week 2. You’ll do one exercise each day, Monday through Sunday, for 60 seconds (or 30 seconds on each side). Repeat for 3 total rounds.
As a bonus, you can follow along with Wells and the full-length workout below. This workout closely follows Wells’s signature training style, which includes an activation, followed by two supersets and a 60-second burnout to finish.
Related Stories
Here’s your glutes and hamstrings workout
1. Good morning
Like the name implies, this move says, “good morning” to your glutes and hamstrings! This exercise strengthens your posterior chain (the muscles along the back of your body), improves the hip-hinge movement, and supports lower-back strength, Wells says.
Stand with your feet hip-width apart.
Place your hands behind your head and pull your shoulder blades down and back, opening up your chest slightly. This is your starting position.
Inhale and bend your knees slightly, then hinge forward from your hips, keeping your chest lifted and your spine aligned with your head.
As you hinge forward, engage your core and maintain a straight back. You should feel tension in your hamstrings.
Exhale and push through your heels, using the strength of your glutes and hamstrings to straighten your hips and return to the starting position.
Repeat the movement for 30 seconds, focusing on form and controlled motion.
2. Standing glute kickback
Though compound moves (those involving more than one muscle) give you more bang for your buck, isolation exercises like this one give your glutes a little extra kick. By zeroing in on the gluteus muscles, this exercise helps improve hip stability, promote better posture, and fire up your lower body for the workout to come.
Stand with your feet hip-width apart. Step your left foot slightly behind you.
Exhale and lift your left foot off the mat, squeezing your glute as you kick your heel straight back behind you while keeping your leg extended and foot flexed, toes facing forward.
Inhale as you lower your right foot back to the starting position, maintaining control.
Repeat the movement on the same side for 15 seconds.
Switch sides and perform on your left leg for 15 seconds.
3. Romanian deadlift
Similar to the good morning exercise, this classic weight-lifting move is highly effective for targeting the hamstrings and glutes.
Hold one dumbbell by gripping the top bell with both hands. Hold it in front of your legs, and plant your feet shoulder-width apart.
Pull your shoulder blades down and back, lifting your chest slightly, and gently engage your core.
Inhale and bend your knees slightly, then hinge forward from your hips, letting the dumbbell slide down the front of your thighs and halfway down your shins.
Keep your chest lifted and ensure that your head stays aligned with your spine. You should feel tension in your hamstrings.
Once you reach halfway down your shins, push through your heels and engage your glutes and hamstrings to extend your knees and hips, returning to standing.
Repeat for 12 reps.
4. Weighted glute bridge
This exercise strengthens the glutes and lower back while helping to build core stability and reduce lower-body imbalances.
Lie on your back, bend your knees, and place your feet hip-width apart.
Carefully place a dumbbell on your hip bones, holding it securely.
Exhale and press your heels into the mat while activating your glutes, lifting your pelvis off the floor until your body forms a straight line from your chin to your knees, resting on your shoulders.
Inhale and lower your pelvis back to the starting position with control.
Repeat for 30 seconds or 12 reps, whichever comes first.
5. Goblet sumo squat
The goblet sumo squat promotes better hip mobility through a wider stand and strengthens the lower body, emphasizing the inner thighs more than other squat variations.
Hold a dumbbell or kettlebell with both hands directly in front of your chest, and plant your feet slightly wider than hip-width apart, toes pointing slightly outward.
Inhale and bend at your hips and knees, making sure your knees track over your toes.
Continue bending your knees until your thighs are parallel to the floor, maintaining a back angle of 45 to 90 degrees to your hips.
Exhale and push through your heels, extending your knees to stand back up and return to standing.
Repeat for 30 seconds or 12 reps, whichever comes first.
6. Alternating reverse lunge
Looking for a knee-friendly lower-body exercise? This lunge variation improves balance, coordination, and lower-body strength while reducing stress on the knees.
Stand with your feet shoulder-width apart and engage your core.
Inhale and take a large step back with your right foot. As you place your right foot on the floor, bend both knees to about 90 degrees, distributing your weight evenly between both legs. Ensure your front knee is aligned over your ankle and your back knee hovers just above the floor.
Exhale as you extend both knees, shifting your weight back onto your left foot, and step your right foot forward to return to the starting position.
Inhale and take a large step back with your left foot, repeating the same motion.
Continue alternating between your right and left legs for 16 reps total (8 on each leg).
TIP
Holding a dumbbell in front of your chest is a good way to advance this move, but make sure you have the balance down before you add weight.
7. Fire hydrant
Though it has an odd name and you may feel a bit awkward performing it, the fire hydrant exercise is a great way to target the glute medius, helping stabilize the hips and improve overall leg strength and mobility.
Begin on all fours, knees below your hips and your hands below your shoulders.
Keeping your knee bent, lift your left leg out to the side while ensuring your hips and shoulders stay square and parallel to the floor.
Inhale and lower your left leg back to the starting position, but keep your knee hovering just above the mat.
Are you one of those athletes who rely on a morning cup of coffee to jumpstart your day? Or maybe you reach for an energy drink to fuel your intense training sessions? Whatever your go-to source of caffeine is, you’re likely aware that this powerful stimulant can significantly impact your body and enhance your workout performance.
For many bodybuilders and athletes, caffeine isn’t just a pick-me-up; it’s a key player in their fitness regimen. Research shows that caffeine can effectively boost physical performance, helping you push harder, train longer, and achieve your fitness goals faster.
But what exactly makes caffeine so effective? And how can you harness its benefits while avoiding potential downsides? In this article, we’ll explore the science behind caffeine, its role in enhancing workout performance, and how to use it strategically to take your training to the next level. So grab your favorite caffeinated drink, and let’s dive in!
Caffeine is a natural stimulant in coffee, tea, chocolate, energy drinks, and even some pre-workout supplements. When you consume caffeine, it quickly enters your bloodstream and makes its way to your brain. Here, it blocks the action of adenosine, a neurotransmitter responsible for promoting relaxation and sleep. By blocking adenosine, caffeine keeps you alert, increases endurance, and gives you that much-needed boost to power through tough workouts.
But that’s just the beginning. Caffeine also increases the activity of neurotransmitters like dopamine and norepinephrine, elevating mood, enhancing focus, and improving cognitive function. On top of that, it stimulates your central nervous system, increasing heart rate and blood pressure, while triggering the release of adrenaline. This hormone prepares your body for physical exertion.
However, it’s important to note that regular caffeine consumption can lead to a tolerance build-up. Over time, your body might need more caffeine to achieve the same effects, which is something to keep in mind when planning your intake.
Whether you’re hitting the gym or going for a long run, caffeine can be a game-changer for your workout. Here’s how:
1. Supercharged Performance
Caffeine is known to enhance physical performance by reducing fatigue and boosting energy levels. By blocking adenosine, caffeine helps you stay alert and focused, allowing you to train longer and harder without feeling drained. Studies show that even moderate doses of caffeine before a workout can significantly improve athletic performance, giving you the edge you need to reach new personal bests.
2. Energy Amplification
As a central nervous system stimulant, caffeine is your go-to for that much-needed energy surge. By increasing levels of dopamine and other neurotransmitters, caffeine not only keeps fatigue at bay but also boosts motivation. This can be especially beneficial if you’re struggling with low energy or find it hard to stay focused during your workouts.
3. Endurance Enhancement
Caffeine’s ability to improve endurance is well-documented. It delays fatigue, enhances muscle contraction, and increases the release of adrenaline, which helps you sustain high-intensity efforts for longer. This is particularly useful for endurance athletes or anyone looking to push through the final reps or miles in their workout.
4. Fat-Burning Accelerator
Looking to shed some body fat? Caffeine can help. By stimulating your sympathetic nervous system, caffeine increases your metabolic rate and promotes fat oxidation. This means your body is more efficient at using stored fat as fuel, which is ideal for those aiming to improve body composition.
5. Cognitive Boost
Caffeine isn’t just for the body—it sharpens the mind too. By improving blood flow and oxygen delivery to the brain, caffeine enhances memory, reaction time, and overall cognitive performance. This mental edge can make a big difference in maintaining proper form and technique during complex exercises, reducing the risk of injury, and maximizing workout effectiveness.
6. Pain Reduction
Got muscle soreness? Caffeine can help with that too. It has been shown to reduce muscle pain during and after exercise, allowing you to train at higher intensities with less discomfort. This pain relief effect is due to caffeine’s ability to block adenosine, which can cause inflammation and pain.
7. Heightened Alertness and Focus
When your workout demands intense concentration, caffeine comes to the rescue. By boosting dopamine levels, it enhances mood and motivation, helping you stay laser-focused on your goals and powering through even the most challenging training sessions.
The Double-Edged Sword: Weighing the Benefits and Drawbacks
Caffeine offers numerous benefits, but it’s not without its downsides. Understanding the pros and cons will help you use it effectively:
Pros:
Supports Brain Health: Caffeine enhances brain function, improving focus, alertness, and memory. Regular consumption may even reduce the risk of cognitive decline and diseases like Alzheimer’s.
Promotes Weight Loss: By boosting metabolism and reducing appetite, caffeine can aid in weight loss, making it a valuable tool for athletes looking to cut fat while preserving muscle mass.
Heart Health Support: Caffeine improves blood vessel function, promoting better circulation and reducing the risk of cardiovascular disease.
Mood Enhancement: Caffeine increases the release of dopamine, lifting your spirits and reducing the risk of depression.
Antioxidant Power: With its antioxidant properties, caffeine helps protect your body from the damage caused by free radicals, potentially lowering the risk of chronic diseases.
Cons:
Sleep Disruption: Caffeine’s stimulating effects can interfere with sleep, especially if consumed later in the day, leading to insomnia or poor sleep quality.
Jitters and Anxiety: Some people may experience restlessness, anxiety, or jitters, particularly if they’re sensitive to caffeine or consume it in large amounts.
Digestive Issues: Caffeine can irritate the digestive tract, leading to discomfort such as heartburn or nausea, especially when consumed on an empty stomach.
Dehydration: As a diuretic, caffeine can increase urine production, potentially leading to dehydration if not balanced with adequate fluid intake.
Dependence and Withdrawal: Regular caffeine use can lead to dependency, with withdrawal symptoms like headaches, fatigue, and irritability when intake is reduced.
Caffeine can be a powerful ally in your fitness journey, offering benefits that range from increased energy and endurance to improved focus and fat-burning. However, it’s essential to use it wisely and in moderation, ensuring it complements a balanced lifestyle without leading to negative side effects.
Whether you’re a seasoned athlete or just starting your fitness journey, understanding how caffeine affects your body and workout can help you harness its full potential. So next time you’re preparing for a big training session, consider how a strategic dose of caffeine might give you the boost you need to crush your goals and elevate your performance.
With the right approach, caffeine can be more than just a morning ritual—it can be a powerful tool in your training arsenal. Use it wisely, and it might just be the secret weapon that helps you achieve the gains you’ve been working so hard for.
The last reason for following an Instagram booty chick is to learn something about strength training. It’s just really hard to take people seriously when they’re parading around 95% naked on social media. And that goes for men and women.
Who are Instagram booty chicks? If you use this platform, you’ll know what I’m talking about. These particular Instagram users do everything in an effort to emphasize their backside. They go to great lengths, wearing the precise clothing and doing the precise exercises videoed from the precise angles, to get as many eyes on their butts as possible.
But what if all those semi-bare asses could actually teach us something about building muscle, staying healthy, and getting strong? Is it even possible?
Well, if you’re going to follow them at all, then maybe it’s about time to stop gawking and start learning a thing or two about their glute building methods. And yes, I’m dead-ass serious.
The Primary and Secondary Actions of The Glutes
The glutes are the cornerstone musculature of human performance and function. Comprised of the gluteus maximus, gluteus medius, and gluteus minimus, this muscular region is responsible for far more than growing a (mostly horny and desperate) following on Instagram.
Though the three distinct muscles have differing isolated actions based on biomechanical origin and insertion points, this region functions in synergy with each individual muscle playing a larger role in global function.
The main action of the gluteus maximus is to extend the hip, but many times we forget about the secondary and tertiary actions of the glute max and the assistance that the smaller, deeper medius and minimus muscles assist in:
Hip extension
Hip abduction
Hip external rotation
Posterior pelvic tilting
To activate the glutes and elicit the desired training response, all four gluteal actions must be targeted and trained to some extent. Neglecting any of these actions leaves strength and growth potential on the table, while increasing likelihood of compensatory patterns, joint stress, and risk of injury in the process.
Based on hip anthropometrics, body typing, movement skill and past history, each set of glutes is unique, which makes the need to optimal activation highly individualized. What we do know is that doing as many gluteal actions as possible is ideal, no matter the individual variances of biomechanics or neural drive.
Here’s how to intelligently train the glutes while tapping into all unique actions of this region.
#1 Hip Extension
Thanks to the work of glute-training expert, Dr. Bret Contreras, we’ve finally started to adopt the idea of challenging the glutes more directly under significant strength and hypertrophy-based loading parameters.
Putting aside any biased opinion regarding the hip thrust’s direct transference into power sport, this movement and its derivatives continue to be one of the safest and most effective ways to challenge the glutei directly with plenty of external loading.
As Bret says, “Loaded bridges and thrusts are among the most popular and successful movements for the posterior chain due to their inherent safety, low coordination and equipment requirements, constant tension on the hips, and highest levels of gluteal activation elicited during the concentric portion of the movement.”
Those with the most technically sound (and usually the strongest) hip thrusts all have a commonality in their execution: they use maximal torque and stability output at the hip rotating into slight external rotation and abduction.
When hip contraption is optimized, the pelvis can better maintain it’s mostly neutral position, making the properly executed hip thrust a four-out-of-four on targeting all muscular actions of this region. It’s one of the best bang for your buck booty exercises out there.
#2 Hip Abduction
The highest yielding glute isolation movement is the hip thrust, so why do we see so many booty chicks flocking to the Stairmaster, shackled down with elastic bands around their knees, to build their glutes? Aside from being far more easy than moving iron, the banded hip work more directly targets the abduction action of the glutes.
But instead of discounting the banded hip abduction variations due to the constant hilarity that ensues daily among the booty chick population, let’s learn from it.
The main problem with the banded Stairmaster training is the non-adherence to proper loading parameters for tissue adaptation, in addition to not properly utilizing the power of dynamic hip abduction.
If you plan on hip extending against the band on the Stairmaster for abhor a day, chances are that’s going to be one light-ass band. Loading with a heavier band around the knees but also around the ankles can elicit stronger and more authentic contraction qualities and hit a relative fatigue level in the glutes that doesn’t take thousands of steps to get there.
Focus on heavy banded multi-angled lateral walks instead. Or if you really want to go old school rehabilitation with your booty building, the traditional side-lying or seated banded clam with fine-tuned band tension is also a proven way to better isolate the gluteus medius along with the maximus. It’ll induce hypertrophy and metabolic stress.
#3 Hip External Rotation
Training hip external rotation dynamically in isolation is extremely hard, if not impossible. This is the main difference between primary actions and secondary actions in terms of practical trainability.
For a majority of lifters, the inability to conceptualize a huge point A to B type movement usually leaves them simply omitting this important secondary action from training. Case in point, external rotation at the hip.
Utilizing a pre-tensioning and slight external rotation at the hip before more compound-based movements like squats, deadlifts, and hip thrusts can be hugely advantageous in terms of targeting and building good movement patterning. The stronger and more stabile we can biomechanically position our hips, pelvis, and core, the stronger the neural drive will be with minimal force leakage under loading.
The most effective movement I picked up from Dr. Contreras that pre-rotates the hip with perfection is the frog pump. Here’s what he says about it:
“Out of all glute bridge stances (wide, narrow, narrow abducted, and frog), frog pumps lead to the highest level of glute activity. This is due to the inherent abducted position, which has been shown to increase glute activity independently during hip extension. But not everyone will feel the frog pump highly activating their glutes. Around one-third of individuals will prefer normal or wide-stance bridges. This is probably due to individual differences in hip anatomy and gluteal architecture.”
Even though this movement involves loading a dumbbell directly over your pubic area, the results speak for themselves. Test it out.
#4 Posterior Pelvic Tilting
The last action of the glutes is the posterior pelvic tilt, also known as the anti-Instagram booty position. It’s a tucked tailbone position and is more about posturing rather than dynamic action.
To maximize muscular trainability, we must first position for biomechanical success, then wire the neural dynamics of the movement pattern to increase neural drive, activation patterns, and the ability to fatigue the targeted musculature without overly compensating with non-contractile structures like the joints.
Simply put, activation of the glutes through the other muscular actions are dependent on first having a strong and stable pelvic base to work from. This is the foundation, and it can’t be faked.
The coveted Instagram ass shot incorporates terminal amounts of anterior pelvic tilt. While this may serve its role to generate likes on social media, many Instagram booty chicks don’t stop at just pictures in this pelvic posture. Pictures turn into videos, videos turn into workouts, and before you know it the highly dysfunctional APT position is their new normal that’s damn hard to break away from.
It’s no wonder why duck-faced booty chicks are struggling to stay healthy while strength training and end up resorting to fluffy banded BS, pink dumbbells, and endless cardio. While there are certainly some things to learn from their interesting glute training methods, there’s far more info to knowingly forget as quickly as possible… once you stop staring.
About The Author
Dr. John Rusin is a sports performance specialist and injury prevention expert that has coached some of the world’s most elite athletes, barbell sport competitors, and over 10,000 clients from all walks of life with his innovative pain-free performance programs and systems, which has gained him the reputation as the go-to industry expert for rebuilding after pain, injuries or plateaus. Dr. Rusin is also the founder of the Pain-Free Performance Specialist Certification (PPSC) that has certified over 7,500 personal trainers, strength coaches and rehab pros from across the globe in the pain-free performance training system since 2019.
The post 4 Secrets For Growing Your Glutes <br> <span class='subheadline'>How To Build Big Beautiful Badass Glutes</span> appeared first on Dr. John Rusin – Exercise Science & Injury Prevention.
Every year, we witness the emergence of new fitness trends, challenges and miracle workouts. In today’s fast-paced world, that is normal. Enthusiasts and professionals alike strive for new ways to improve performance, achieve fitness goals, help lose weight and keep motivation high. And they do all that while keeping engagement high on their social media platforms. Ultimately, that’s why these new trends appear so often.
As a fitness blog, it’s our job to write about these phenomena. After all, we must search further and review these internet fads and guarantee they help our members reach their goals. In fact, very recently we wrote about a fitness challenge that was making the rounds online: the 12-3-30 treadmill workout. We’re back with yet another online fitness sensation — the 75 hard challenge. Scroll to learn all about it.
What is the 75 hard challenge?
First of all, a disclaimer: the 75 hard challenge isn’t a workout. It’s a self-improvement and mental challenge created by Andy Frisella, an entrepreneur and influencer. In his words, this is a “transformative mental toughness program”. It consists of 6 fundamental rules that you must do for 75 days in a row:
1 – Stick to a diet of your choice
Keto, paleo or vegan: it’s up to you. It must be, however, a diet. So, no cheat meals or fast food.
2 – No alcohol
Are you thinking about relaxing with a glass of wine on the weekend? Well, during this challenge, you can’t. You must stay 75 days without drinking any alcoholic beverages.
3 – Perform two 45-minute long workouts per day
Yes, one workout per day isn’t enough. However, there’s a catch to this: one of the workouts has to be outside, no matter the weather conditions.
4 – Drink a gallon of water a day
For those who don’t know, one US gallon equals 3.8 litres. We’ll talk about this later, but please be careful with this one. There’s no one-size-fits-all answer to how much water you should drink daily.
5 – Take a progress photo every day
Now, here’s something we can’t dispute and that most gym-goers enjoy doing. By all means, please enjoy your progress pics!
6 – 10 pages of non-fiction self-development books each day
We’re a fitness club and, as we said above, this is a self-improvement challenge. If you want to read novels, poetry, or just fan-fic online, please do.
What’s the catch? You must do all these tasks for 75 days in a row, and if you fail to complete any of them on a given day, you must restart the challenge from day one. The main idea is to create habits that improve physical health, enhance mental resilience and contribute to personal growth.
But does it work?
Some of the practices can be disputed. For starters, the water consumption. According to the British Dietetic Association (BDA), an adult men’s optimal water intake is 2000ml, whilst women’s is 1600ml. Too much of anything is bad, so water consumption is no exception.
Asides from that, this challenge requires you to be on a diet, so you won’t have any cheat meals or alcohol consumption. Plus, you’ll have to do two workouts a day. If you follow at least these, almost certainly this will work.
However, before starting any program like this, consult a healthcare professional. The 75 hard challenge might not be suitable for everyone, and it’s fundamental to put your well-being first.
Is hitting a muscle from a different angle actually better for muscle growth? This idea has been talked about forever in gyms from old-school bodybuilders, leading some to believe it’s just typical “bro-science”.
However, the answer may surprise you. The idea is that using different exercises to train a muscle at different angles will result in more muscle growth. It sounds like it makes sense, but could something so simple really result in bigger muscles? And if so, how do you use it in your program? This article will let you know.
Hitting A Muscle From Different Angles For Muscle Growth
Hitting a muscle from different angles is a common training method of some within bodybuilding. As mentioned, the basic idea is that this will stress the muscle differently which in turn causes fuller growth.
The most obvious example of this, which almost anyone can relate to, is using the incline bench press and bench press. It’s claimed that performing the incline bench press hits the upper chest to a higher degree, specifically the clavicular head. We can tell you that it very much does but we’ve even heard some say this is not true and that you can’t even target the upper chest!
That’s odd, because this study showed that using an incline bench at incrementally greater inclines (0° < 28° < 44° < 56°) resulted in greater growth resulting in significantly greater activation of the clavicular head1.
Does Using Different Angles Make A Difference?
Even though it seems obvious that a muscle will respond differently to different exercises, there has always been a group that claims it’s all just bro-science. For example, a common claim is; “Your body doesn’t know what exercise it’s doing; it just fires!”. We see how that makes sense but it shows misunderstanding of how our muscles operate (we’ll get into that below).
However, if we are to believe that your muscle either fires or doesn’t, it would raise many questions. The primary issue is; why do we use more than one exercise for every muscle group?
For example, if your chest doesn’t “know”, why do we perform dips, incline bench presses, and bench presses on the same day? Why not just bench press for the rest of your life?
In fact, look at how many variations of the row we have:
Bent over row
Seated narrow grip
Seal row
Face pulls
T-Bar row
That’s just 5! Now, obviously, these are different exercises, but they all essentially train the same muscles with similar biomechanics. The point is that this begins to shed some light on using angles and that maybe your muscles don’t always respond the same.
And let’s not mention that researchers use EMG readings to measure muscle activation during different exercises. If angles of an exercise don’t matter, we would expect EMG readings to all be the same.
As we said, we don’t need to ask too many questions before we realize that exercises affect how muscles fire. Also, we have quite a few studies that show this is legitimate.
Research That Supports Using Multiple Exercises To Train A Muscle
Now, we’re going to review some of the research showing that using different angles to hit a muscle will likely result in more muscle growth.
But before we go further, this does not mean to haphazardly use different exercises every day. We’ll get into the actual application towards the end of the article but just keep that in mind.
Regional Hypertrophy And Non-Uniform Muscle Growth
This plays a huge role in understanding why hitting a muscle with different angles could increase growth. When talking about muscle growth, we assume that the whole muscle grows together as if you’re blowing up a balloon. However, this would assume that the muscle is one big chunk of meat. It’s not.
Your muscle comprises thousands of small muscle fibers that intertwine like a rope. These fibers wrap around each other and contract together, providing strength. What’s important to realize is that these fibers fire independently. This should show us that the muscle isn’t just a solid piece of muscle that either “contracts or not”.
Still, for a muscle to see uniform growth, we must see uniform growth among every muscle fiber.
But we don’t.
Non-Uniform Growth In Research
Research has shown that the muscle fibers of a muscle will vary in hypertrophy depending on the exercise. Different exercises will put the muscle in a different angle which causes different areas to have higher levels of stress. These areas of greater stress generally see greater growth.
What this means is that a muscle may see more growth in the distal portion (point farther away from the body, i.e., the quads near the knee) than in the central portion or proximal portion (point closest to the body, i.e., the quads near the hip,)
A large review, conducted in 2000 by a team of leading sport researchers, was performed to research this phenomenon2. The review analyzed numerous studies and made some pretty significant conclusions that we’ll get to. But first, let’s look at one of the studies reviewed in this comprehensive review as it clearly demonstrates the topic of uniform growth.
In this study, researchers trained the quadriceps for 6 months using knee extensions and then measured the differences in muscle growth in all 4 muscle heads of the quadriceps. A simple study design with some pretty remarkable finding;
The distal and proximal regions saw 19% growth
The central region saw a 13% growth
Vaastus lateralis and rectus femoris showed the greatest hypertrophy in the distal region
Vastus intermedius and medialis muscles showed greater hypertrophy in the proximal region
What this means is that the quadriceps saw different amounts of growth in different parts of the muscle. But things get even more interesting when looking at the 4 muscle heads. Even though the distal and proximal region saw similar increases in growth, the growth came from different heads!
There are a ton of studies that show this, but the researcher’s conclusion is the most telling:
“The author speculates that no single exercise can maximize the hypertrophic response of all regions of a particular muscle. Thus, for maximal hypertrophy of an entire muscle, athletes (particularly bodybuilders) are justified in incorporating various exercises that purportedly stimulate growth in a regional-specific manner.”
Slight Variations Can Hit A Different Muscle Head Slightly Different
As we just saw, a single exercise will hit different parts of the muscle differently. That’s interesting, but does it mean using slight exercise variations will cause different activation?
Remember, the claim is that your muscle “”doesn’t know,” so from this viewpoint, it really shouldn’t matter. Well, it does. But again, we intuitively know this as we have likely all used different grip widths and back angles when performing the bench press.
We already went over the incline press above but this study goes even further to see how incline and grip width can affect muscle activation3.
Researchers used 12 different variations of the bench press to measure the activity of 4 muscles;
Pectoralis major sternal head (mid & lower chest)
Pectoralis major clavicular head (upper chest)
Pectoralis major abdominal head
Triceps brachii long head
The 12 combinations were made by using;
2 grip widths (wide & close)
2 grips (overhand & underhand)
3 bench angles (decline, flat, Incline)
When the study was complete, the researchers found that each combination hit each muscle differently. The following are the highest and lowest activity for each muscle;
Pectoralis major clavicular head
Highest: Flat / Overhand / Close & Incline / Overhand / Close
Further, the degrees of activation were wildly different. This is a clear example of how slight variations can cause different degrees of activation. Now let’s see how varying your exercise selection can actually result in superior muscle growth.
CICE: Constant Intensity and Constant Exercise
CIVE: Constant Intensity and Varied Exercise
VICE: Varied Intensity and Constant Exercise
VIVE: Varied Intensity and Varied Exercise
Control (C): This group does not participate in the experimental training protocols and serves as a baseline to compare the effects of the training regimens.
Multiple Exercise Vs Single Exercise In Muscle Growth
There have been a few studies comparing the use of a single exercise versus multiple exercises to train the same muscle. These exercises
A very telling study was performed in 20144. Researchers had two groups of trainees follow a volume-equated program for 12 weeks to train the legs. The following groups are as follows:
Squat
Squat, leg press, lunges
At the end of the 12 weeks, the growth of the total cross-sectional area of the quadriceps was relatively equal. However, when looking at muscle growth in the four heads of the quad, the groups using 3 exercises had fuller growth in all four muscle heads.
In comparison, the squat-only group only saw significant growth in the vastus lateralis and vastus intermedius, while the rectus femoris and vastus medialis failed to hit significant numbers.
Further, using multiple exercises did result in significantly greater strength gains, likely due to higher neural drive. The review concludes,
“…it would be advisable for bodybuilders to engage in different exercises to induce hypertrophy of different regions of a muscle”” and that using multiple exercises to train a muscle should be an “integral part” of a training program.”
A similar study was performed training the biceps, and again, the group using varied exercises resulted in fuller muscle growth5. Also keep in mind that it’s likely you’ll have a greater difference the longer you train.
How To Hit The Muscle Using Different Angles
So now we got to the part where we apply these findings to training.
This means that hitting a muscle from different angles could include:
Making slight variations in grip and biomechanics.
Different exercises are used to hit the muscle from a different angle.
How Frequent Should You Switch Exercises?
This is important as you may be inclined to change exercises every day to promote more gain. Don’t do this!
This ultimately amounts to the practice of “muscle confusion”, where lifters change exercises constantly. Doing this will result in less progress, as the basic tenets of progressive overload still apply! Your body needs time to adjust to exercise, and you must then allow yourself to make progress. This is especially true for your major exercises.
The minimum time you should use a single exercise is 4 weeks but 6-8 weeks is likely better for the majority of people.
When it comes to accessory work and smaller exercise, most people should still stick with the 4-week time frame. However, if planned properly, you could go shorter. Sometimes, we even perform a different biceps curl at the end of every pulling session. Our goal with these is to simply perform to failure.
Still, this should be done systematically. For example, maybe rotate through 4 biceps curls weekly in the same order. To be clear, this is just an example of how to use the rotation of exercises systematically; we are not saying you do this. The primary principle is you need a plan and reason for what you’re doing. Randomly changing exercises will get you nowhere.
Don’t Replicate Similar Biomechanics!
This may be the most directly applicable method for many people. Have you ever seen someone perform the bench press, dumbbell bench press, and push-ups in the same training session?
Sure, these are differences between these chest exercises, but they all use very similar biomechanics.
We could easily use slight variations to these exercises and likely see better results. For example:
Barbell bench press
Incline dumbbell press
Close grip push-up
You see how we use the same exercises but with some variation. Then in 6 weeks, you could just change these 3 exercises and keep moving.
Incline barbell bench press
Decline dumbbell press
Push-up
Will Using Different Angles Of The Same Exercise Increase Muscle Growth?
We wanted to touch on this in case there is any confusion. Some people who ask; “should I use different angles to train muscle”, may be referring to doing something like doing a cable bicep at different heights or using a close grip or wide grip.
The answer again is “yes.” Even though many of the studies used different exercises, many of the studies did in fact just use different angles such as the incline bench press or altering the grip. At the same time, consider that using a different exercise essentially just trains the muscle from a different angle.
So again, the answer is yes; using different exercises will likely result in fuller growth and hitting the muscle from different exercises will likely result in full growth.
Related:
Final Analysis On Using Variation To Improve Muscle Growth
As it turns out, there seems to be plenty of research to support the advice of hitting a muscle from different angles.However, this does not mean you randomly use different exercises and constantly change your training. If you’ve been using the same exercise to hit a muscle for 6 months, you should probably make some alterations. Further, it means using as much variation as possible with your chosen exercises for a specific muscle; performing biceps curls with a barbell, dumbbells, and cable machine doesn’t make much sense! In short, use a variation of exercises in a systematic manner to maximize muscle growth.
References:
Trebs, A. A., Brandenburg, J. P., & Pitney, W. A. (2010). An Electromyography Analysis of 3 Muscles Surrounding the Shoulder Joint During the Performance of a Chest Press Exercise at Several Angles.Journal of Strength and Conditioning Research,24(7), 1925–1930. https://doi.org/10.1519/jsc.0b013e3181ddfae7
Antonio, J. (2000). Nonuniform Response of Skeletal Muscle to Heavy Resistance Training: Can Bodybuilders Induce Regional Muscle Hypertrophy?The Journal of Strength & Conditioning Research,14(1), 102–113. https://journals.lww.com/nsca-jscr/Abstract/2000/02000/Nonuniform_Response_of_Skeletal_Muscle_to_Heavy.18.aspx
Roy, X., Arseneault, K., & Sercia, P. (2021). The Effect of 12 variations of the bench press exercise on the EMG activity of three heads of the pectoralis major.International Journal of Strength and Conditioning,1(1). https://doi.org/10.47206/ijsc.v1i1.39
Fonseca, R. M., Roschel, H., Tricoli, V., de Souza, E. O., Wilson, J. M., Laurentino, G. C., Aihara, A. Y., de Souza Leão, A. R., & Ugrinowitsch, C. (2014). Changes in Exercises Are More Effective Than in Loading Schemes to Improve Muscle Strength.Journal of Strength and Conditioning Research,28(11), 3085–3092. https://doi.org/10.1519/jsc.0000000000000539
Costa, B. D. de V., Kassiano, W., Nunes, J. P., Kunevaliki, G., Castro-E-Souza, P., Rodacki, A., Cyrino, L. T., Cyrino, E. S., & Fortes, L. de S. (2021). Does Performing Different Resistance Exercises for the Same Muscle Group Induce Non-homogeneous Hypertrophy?International Journal of Sports Medicine,42(09), 803–811. https://doi.org/10.1055/a-1308-3674
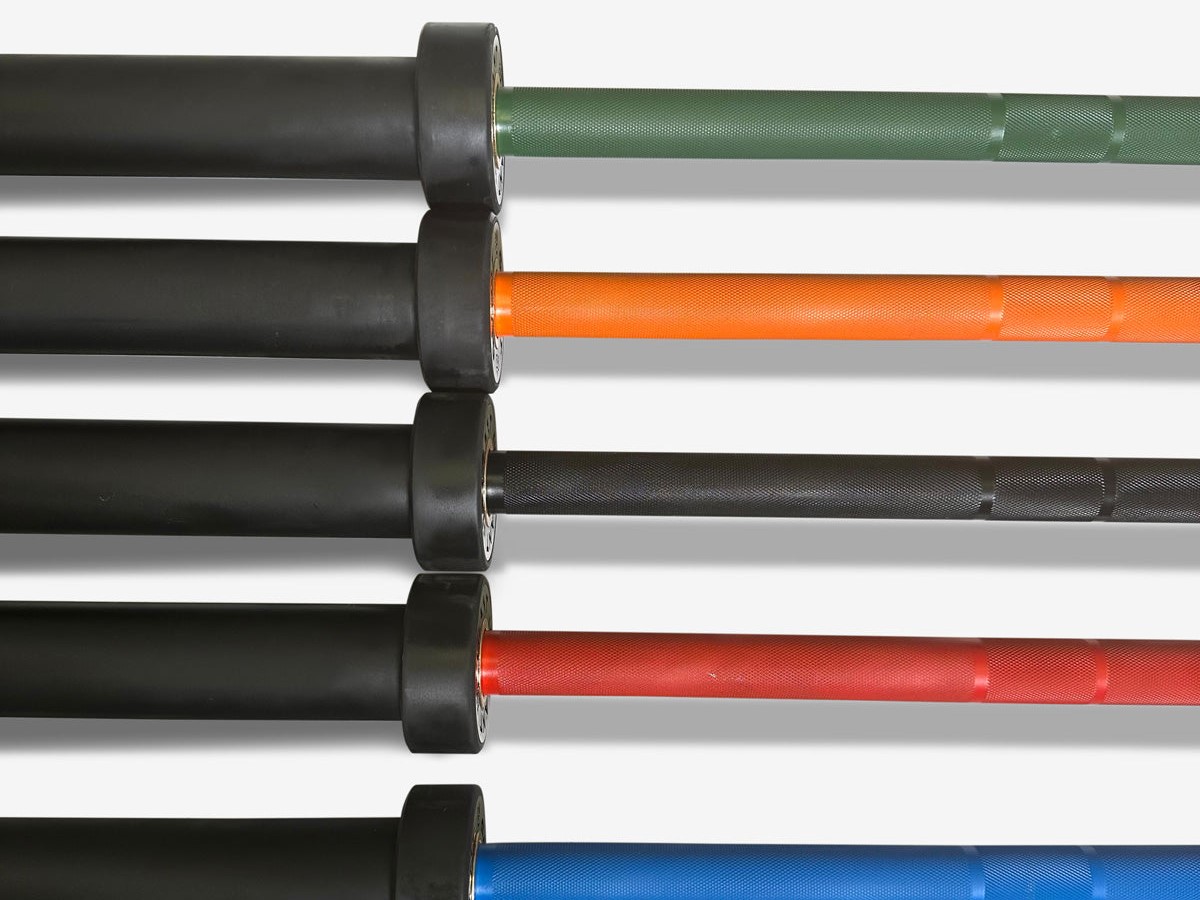
Rewritten in 2023 with a set of different bars, more info on the unique buying points of each, and the price limit raised to $370 to accommodate higher prices over time and a couple bars that deserve a look.
Introduction
Crossfitters have different requirements than old-school lifters focused on the more narrow sports of olympic weightlifting, bodybuilding, powerlifting, or strength training.
The thing is, Crossfitters need a good quality bar that’s good for high-rep olympic lifting AND versatile enough for presses, deadlifts, and varying grip widths.
It’s tough to get a perfect bar that’s good for all types of exercises. There are little trade-offs everywhere that are suited for specific exercises and can make a difference between your making the next PR or getting held back because there’s something not ideal about the bar.
When money is no object and you’re willing to pay $700 for an Eleiko XF Bar (by all means, go for it), you don’t really need this guide. Keeping it down to about half that price, which we are focusing on here, gets trickier.
Comparison Chart
First, here are the top 5 bars under $370 I’ve narrowed it down to.
(scroll right to see all 5)
Why These Bars Made the List
These 5 bars all work great for Crossfit, better than so many others out there. Here’s why.
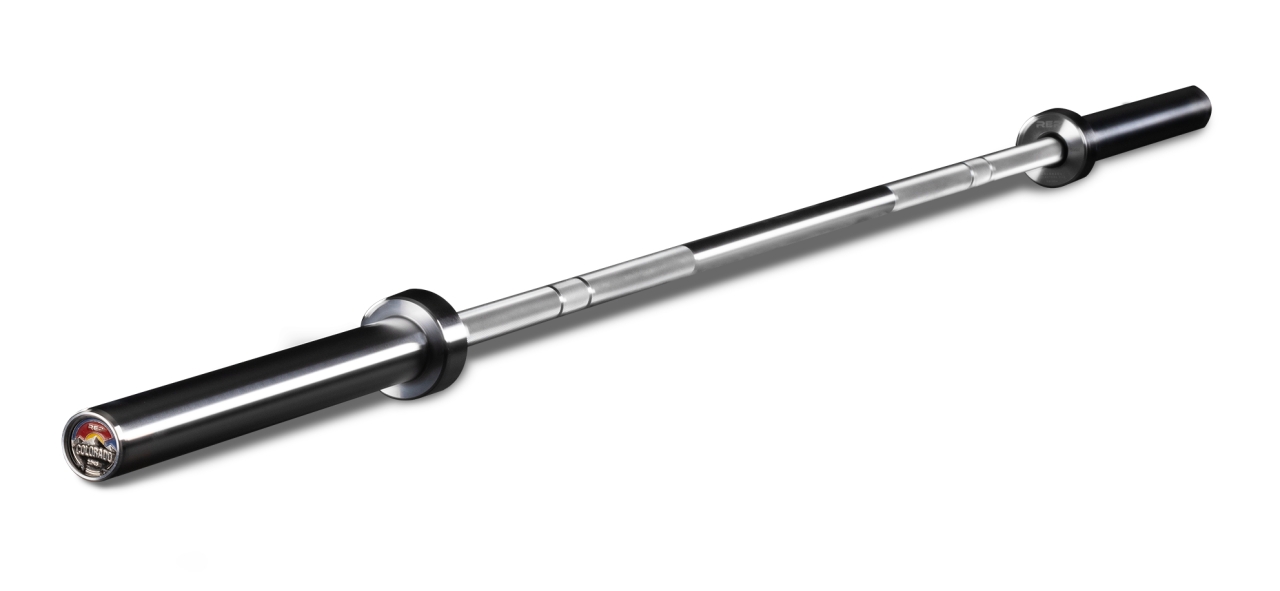
Let’s start with the shaft diameter. A Crossfit bar needs to have a 28mm-28.5mm shaft. Anything thicker than 28.5mm gets harder to hold onto for heavy pulling movements like deadlifts, cleans and snatches. You might wonder, does another half a millimeter actually make a difference? To beginners who have yet to push themselves for long enough to establish their personal bests, no. To the discerning lifter who is struggling at the top of his game, yes, it will make a difference, like any of the rest of these specs.
snap-ring design
And just to make it clear, any of these bars need to be made well, with snap rings to secure the sleeves onto the bar. This is to ensure the sleeves don’t break loose and fall off the bar after enough drops with bumper plates. Dropping a bar is tough on it, even on 3/4″ rubber flooring. Good bars can hold up fine. On the cheapest bars, usually sold for around $100-$115 or included in a 300 lb weight set, you’ll find an allen bolt, which you need an allen key (hex key) to tighten. And tighten it you will. These are notorious for coming loose over time, bending, or even breaking.
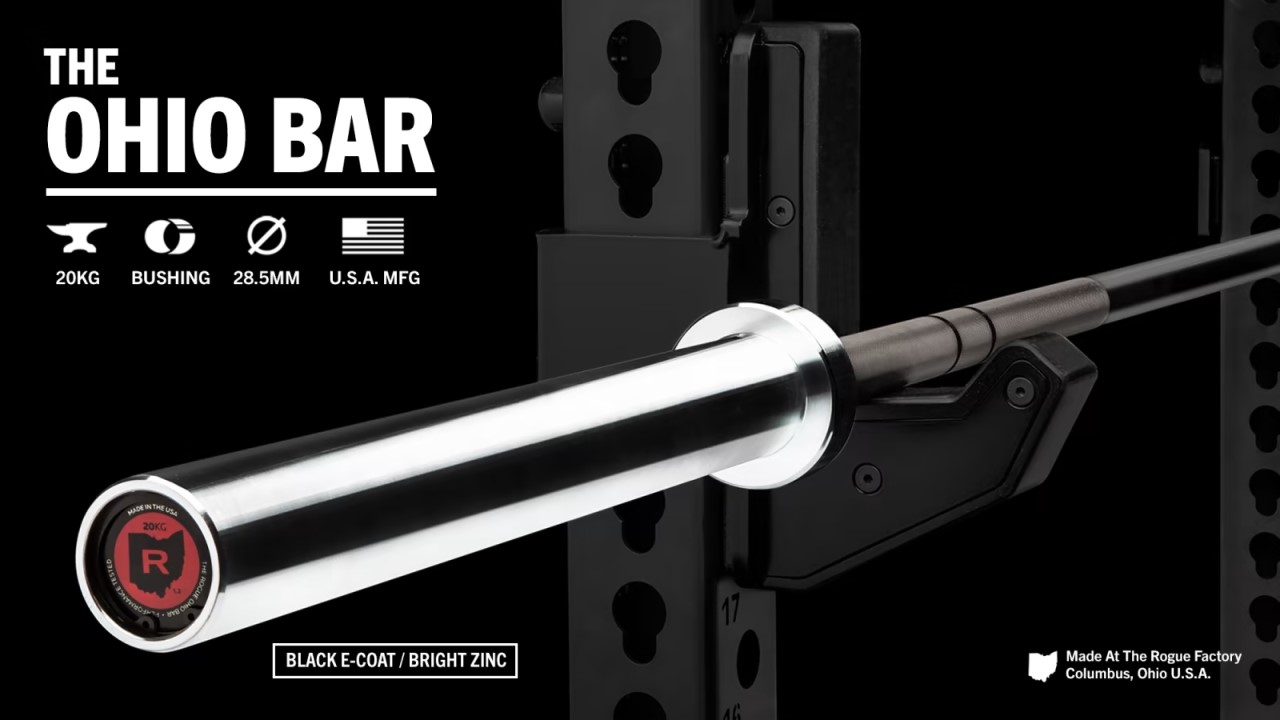
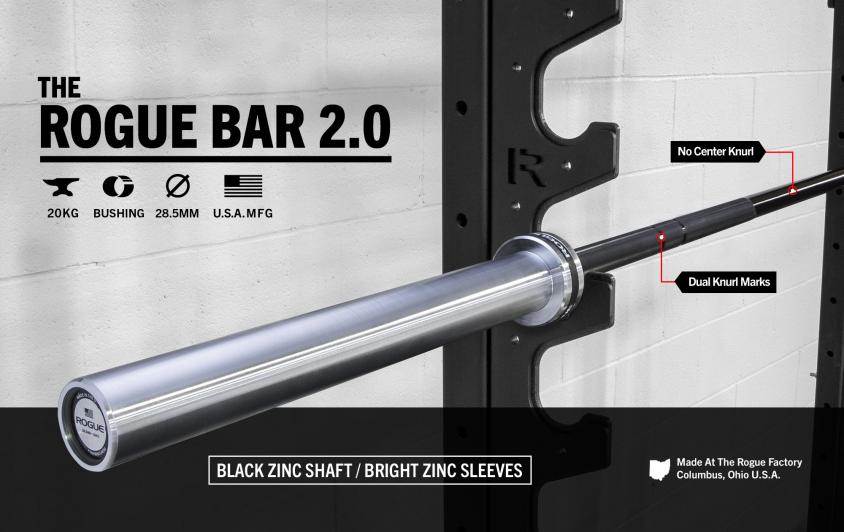
Center knurling is the approximately 8″ section of knurling directly in the middle of the bar shaft. Normally you don’t grip that area. Its main advantage is when you’re doing back squats it creates friction to keep it in place on your upper back. Back in the day it was originally put there for the “one handed snatch”, an exercise that has fallen out of favor (but is still often done as a kettlebell exercise). The bummer with center knurling is that’s the part of the bar that touches the front of your neck when you catch a clean in the “front rack” position. Not comfy, especially for the high reps in a Crossfit workout. For this reason, no center knurling is absolutely the best move here.
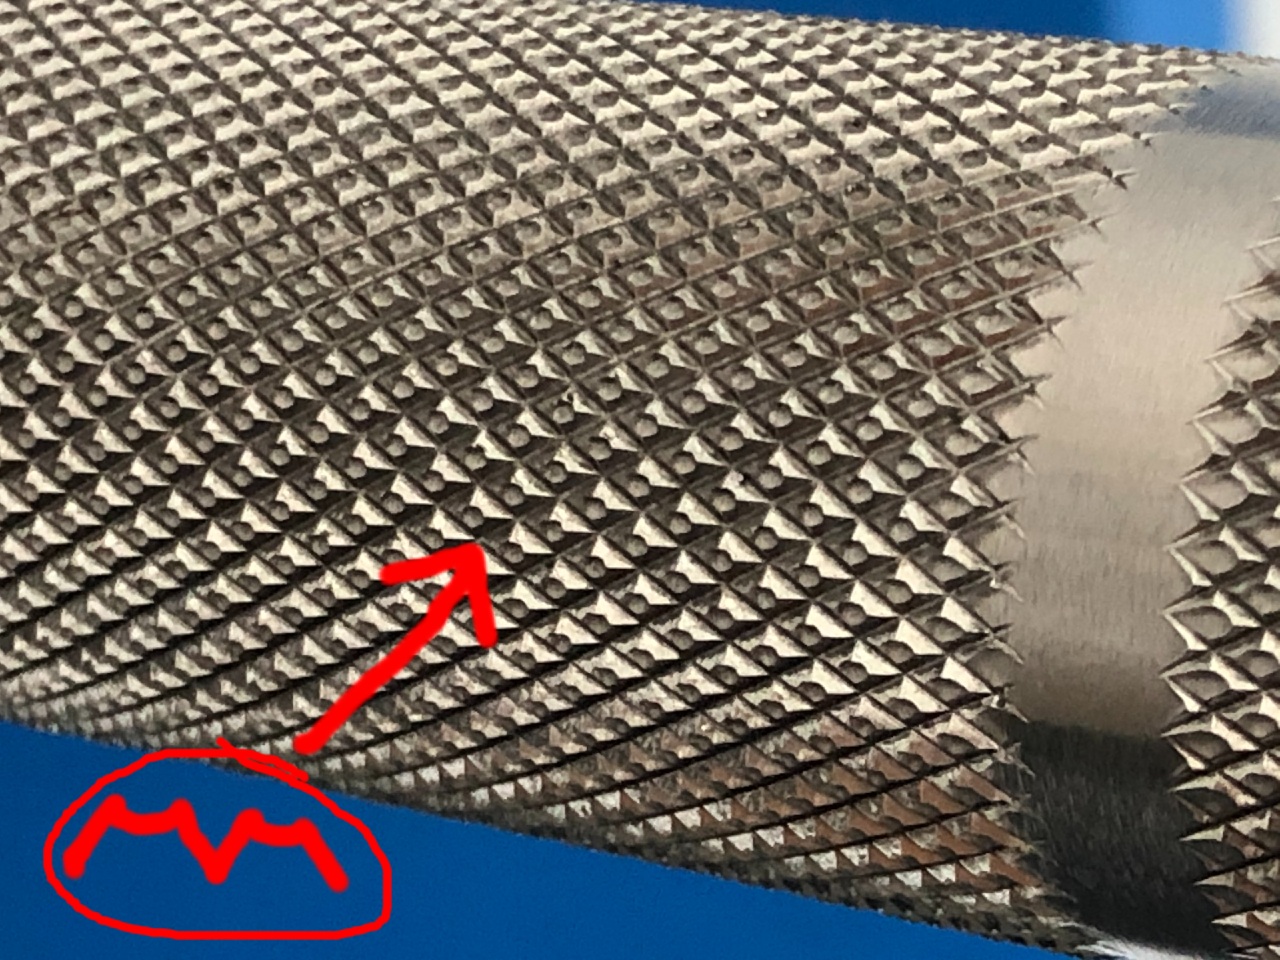
volcano knurl
As far as the rest of the shaft, you need knurling to get any kind of decent grip, with the consideration that it should also be easy enough on your hands. Any bars with mountain type knurl like the Texas Power Bar, or any particularly high-peaked volcano style knurl, are disqualified for this list because they’re a step away from being a cheese grater. Crossfitters tear up their hands enough from high-rep cleans, gymnastics rings work, kipping/butterly pull ups, and kettlebell work that they need to find ways to minimize the damage. On the other end, you don’t want hill type knurl either because it doesn’t give enough of a grip, although in a pinch you could use it. So the best is right between the two, a light to moderate volcano knurl. See our article on knurl patterns for a fuller explanation with pics.
ring marks
About mid-way between the center of the shaft and the edges are some 1/2″ wide non-knurled ring marks in the bar. The position of these is actually precisely specified in the IWF and IPF barbell regulations as 810mm and 910mm apart, respectively. Because Crossfit involves a variety of exercises, double ring marks give you the most visual and tactile guides to precisely place your hands each time. I’ve heard it called several things: double knurl marks, dual knurl marks, or dual IPF/IWF ring marks, or whatever. You get the idea. These aren’t essential, but now that we have a choice and it’s not a unique thing that only one bar in existence has (the York B&R bar was the only one for a while), it’s nice to have. Yeah, we’re pampered. The kids today don’t know how rough we had it!
And lastly, all these bars have 190,000 PSI or greater. 150,000 PSI bars were acceptable in the past, but people have found them to occasionally bend on the platform or rack from bad drops.
Bar Coatings
Hard chrome is the toughest coating, but its surface is so smooth that it gets slippery with sweaty hands, even with the knurling. The chrome plating process also fills in the knurling a little bit, decreasing the knurling’s effectiveness.
Black oxide is some super thin stuff. That’s why it feels so much like bare steel. It’s a coating that’s created by applying a chemical to the steel that causes it to oxidize (rust) into the inert black oxide rather than the brown ferrous oxide we fear. This layer of oxidation is extremely thin, more so than any other coating or plating method out there. However, black oxide also doesn’t do a lot for you unless you oil your bar, which activates the black oxide’s corrosion resistance. And black oxide always rubs off over time, not only from power rack abrasion but just from your hands, which is the main gripe about it from lifters.
Zinc can be bright colored or coated over with a layer of black. Both feel good and aren’t slippery. Zinc plating is done in many industries and is applied to a lot of tools and hardware.
Cerakote, while not new itself, is one of the latest coatings that bar manufacturers have started using. Cerakote is a brand name of a hard and durable ceramic coating, touting a long track record in its use on firearms. The reason it got introduced to bars is it can easily be colored and can even be applied in detailed patterns. Aside from style, colors are nice for identifying a bar among others in a gym.
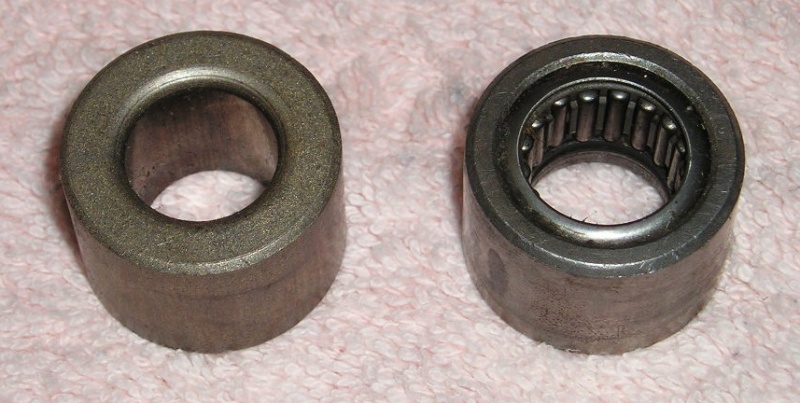
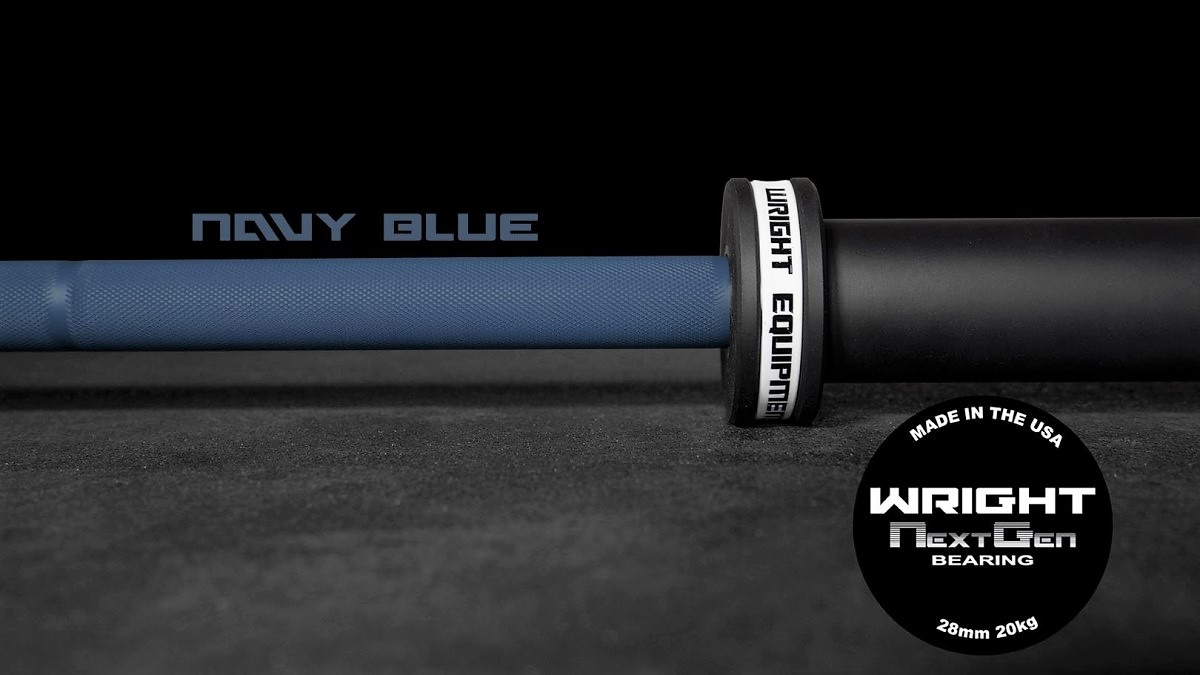
Sleeve Spin – Bushings and Bearings
Spin of the sleeves is a very good thing, I dare say one of the main features of an olympic bar that makes them so much better than tree branches or any spare length of cold rolled steel lying around.
Of course, with sleeve spin in practice we’re actually talking about the spin of the shaft while the sleeves stay pretty much oriented the same. It’s what facilitates the hand transitions in a clean-and-jerk or a snatch. You want the shaft to rotate from the smallest nudge mid-air so you don’t tweak your wrists, which would lead you to tweak your shoulders, back, and everything else in an attempt to save it.
Bushing on the left, needle bearings on the right
Bronze bushings are great. In this application the bronze will never bend or break. It’s hard and doesn’t get roughened up over time. It rubs against steel with low friction for a good smooth spin.
Bearings have the ultimate spin. Ball bearings, which are spherical, is the old way of doing it. The problem with them is a bearing could get dented from a particularly hard uneven drop, or being slammed into a vertical bar holder (one end up). All the modern bars use needle bearings instead, which are like pins instead of balls. These are much more tolerant to really bad drops onto one end, and just as sensitive a spin.
Also, regarding another aspect of the sleeve – Some sleeves have small grooves on the surface, which creates extra friction to stop plates and collars sliding. I won’t get into that here, as the grooved sleeves are covered in another article.
Detailed Look at Each Bar
Bells of Steel Weightlifting Bar 2.0
A tried and true bar that has been popular since it came out around 2018.
Unique Points:
One of the lowest priced of the bunch, and with generally great specs including a whopping 240,000 PSI tensile strength. Bells of Steel is known for having appealing prices on many products.
It only comes in a chrome finish, which is overall the least desired nowadays. This makes the bar slightly dated.
Rep Fitness Colorado Bar
Similar to Rep’s discontinued Excalibur, but with composite bushings instead of a bushing/bearing combination, and Cerakote finish options in addition to chrome.
Unique Points:
The sleeves are finished with Duracoat, while the shaft is Cerakote. I can only imagine this is to save on costs, with Duracoat being the cheaper and less durable option. So this appears to be a negative.
On the plus side, they use composite bushings in the sleeves, the quietest option if you’ll be dropping the bar, as well as arguably the most durable. Most of the other bars here use metal bushings or needle bearings.
Rogue Ohio Bar
Rogue’s longtime flagship bar. You can’t go wrong with Rogue’s quality and dependability.
Unique Points:
The only bar here with stainless steel, black oxide, e-coat, and black zinc options.
Plus, if you want a custom logo bar, this is the only way to go. See the Custom Ohio Bar and upload your image into their online designer.
Along with the Wright bar, Rogue is one of the only USA-made options.
Another Option: Rogue Bar 2.0
To be fair, I don’t really want to be featuring two Rogue bars here and only one of the other brands, but this one deserves a mention too because of its history.
The original “Crossfit bar”, if there ever was one unofficially, would be the original Rogue Bar. It was used for a few years in the Crossfit Games. In 2014 I believe they began using one of Rogue’s other bars with bearings instead, perhaps the Rogue Olympic Weightlifting Bar. Anyway, the Rogue Bar 2.0 has the newer, slightly more expensive composite bushings that hold up really well and are quieter when dropping.
It has a neat silicone band option on the shoulders that you can buy more of in several other colors, making it easy to identify from a distance. Really you could put any kind of elastic band in that groove.
Other than those features, it’s pretty similar to the Ohio Bar.
Wright Next Gen Bearing Bar
At the moment, Wright lists this bar as two different products:
Black Cerakote with a choice of bright zinc or black zinc sleeves
9 Cerakote color/design choices with black Cerakote sleeves only
It appears they did this because they’re offering the zinc sleeves for only the black Cerakote, and I guess their website software is unable to restrict the shaft/sleeve choice combinations. The prices for both listings are about the same. The zinc or Cerakote sleeves are both durable and well-suited for standing up to the abrasion and banging of plates.
You can use our code TWOREP for 5% off this bar (or any order) at Wright. Like Rogue, they charge shipping, so this discount helps a bit.
Unique Points:
Along with Rogue, this is one of the only USA-made bars featured here. I always like to point out USA-made products in these guides.
It’s the only bar featured here with both a 28mm shaft and needle bearing sleeves, making it ideal for olympic weightlifting. Note that not everyone likes the ultra-sensitive spin of needle bearings, even though it’s a premium feature.
FringeSport Midas’ Revenge
One of my main reasons for revising this article was to include this bar! It looks too cool to not mention.
In many ways this bar is similar in construction to their Bomba Bar v3, with a lower price thanks to bronze bushings instead of bearings in the sleeves. They also changed the shaft diameter from 28mm to 28.5mm.
Unique Points:
The gold sleeves make this unlike any bar you’ve seen. Discussions online suggest that this bar really is as cool looking as they advertise it. Fringe has never been afraid to try unique spins on products.
I asked Fringe about the material, and they explained that it’s actually a titanium nitride finish on steel sleeves. Titanium nitride is a hard ceramic coating that is naturally golden colored and is used in other applications like firearms where wear resistance is important. Think of it as much like Cerakote, another common wear-resistant ceramic coating that is in fact used on the shaft of this bar and a few others featured here.
The volcano knurling is more finely spaced than on the other bars here, resulting in smaller volcanos that are not as likely to damage your hands for high-rep workouts.
Giant Lifting Hybrid Bar
Giant Lifting is a relatively new company whose website started up in 2020 after a few years of dealing locally only. They have always been responsive and helpful when I have product questions for my articles.
This bar has gotten almost no attention and appears to me to be overlooked due to its price point. So I’m happy to be the one to give it a shout out here. If you’ve tried it, please leave a comment with your experience!
Unique Points:
Giant Lifting uses a QPQ process to form a coating on the sleeves that is protective against corrosion and wear. QPQ stands for “Quench Polish Quench”, actually a process of nitrocarburizing, polishing, and quenching. If you don’t know what I’m talking about, neither do I. That’s the gist of what I found when looking it up.
Crazy low price of $260. I don’t know how they manage it.
Our links for Giant Lifting get you an automatic 5% off, or use code TWOREP at checkout.